Root a Google Pixel with Magisk: Exact-Build Image Guide
Rooting Google Pixel smartphones powered by Google Tensor processors (including the Pixel 6, 7, 8, 9, and Fold generations) provides elevated superuser permissions across the Android operating system. Unlike legacy devices that relied on custom recoveries such as TWRP to flash binary archives, modern Android devices adhere to Android’s Generic Kernel Image (GKI) architecture and system-as-root partition layouts. Achieving systemless root through Magisk requires extracting the specific stock boot partition archive corresponding to your build, patching it locally inside the Magisk application, and flashing the resulting image over Fastboot.
This guide provides an end-to-end walkthrough for preparing Google Tensor hardware, unlocking the bootloader, distinguishing between boot.img and init_boot.img partitions, and verifying superuser access.
Understanding the Pixel Boot Architecture: boot.img vs init_boot.img
For a guided Windows workflow, use GSM6 Live Root or Root (Direct) with matching firmware. Preview firmware has its own Pixel beta root guide. If USB detection fails, start with the official Google USB driver guide.
A critical technical distinction when rooting modern Google Pixels lies in how Android separates the initial ramdisk from the generic Linux kernel, and how Android Verified Boot (AVB) enforces partition integrity.
1. boot.img vs init_boot.img
- Some Pixel builds use
boot.imgas Magisk’s patch target. - Others provide
init_boot.img. Determine the target from the exact factory image contents and current Magisk installation instructions; do not decide from a broad generation label alone.
Patch only the image documented for the exact model/build. Flashing the wrong partition or a different monthly build can prevent booting.
2. Android Verified Boot (AVB) and vbmeta
Modern Android devices enforce a cryptographic root of trust via AVB. The vbmeta partition stores hashes and descriptors for boot partitions. Flashing a custom or patched boot image invalidates the expected cryptographic hash.
Do not add a generic vbmeta disable command. Follow the current official Magisk instructions for the exact device and image; the required steps can change with device architecture and release.
Prerequisites and Preparation
Before starting the rooting procedure, verify that you have assembled all necessary equipment and software environments:
- Factory Firmware Build Verification: Navigate to Settings > About phone > Build number and note the exact build string (e.g.,
AP2A.240905.003). You must download the matching factory image archive from the official Google Developers repository. - Android SDK Platform-Tools: Download the latest official Google platform-tools package containing updated ADB and Fastboot binaries.
- Google USB Drivers (Windows): Ensure the Google USB Driver is installed so that your PC detects the Pixel under Fastboot Mode (
Android Bootloader Interface). - Data Backup: Bootloader unlocking triggers a hardware-level cryptographic wipe. Back up all personal photos, documents, two-factor authentication tokens, and contacts before proceeding.
Step-by-Step Procedure to Root Google Pixel Hardware
Follow these five sequential stages to prepare the device, extract the correct partition, and flash the patched binary.
1. Enable OEM Unlocking and USB Debugging
Before Fastboot will accept bootloader unlock directives, cryptographic unlocking must be authorized within the running Android environment.
- Open Settings on your Pixel and scroll down to About phone.
- Tap Build number seven consecutive times until the screen announces “You are now a developer!”
- Return to Settings > System > Developer options.
- Locate OEM unlocking and toggle the switch to the On position. Enter your lock screen PIN or pattern when requested.
- Scroll down to USB debugging and enable it.
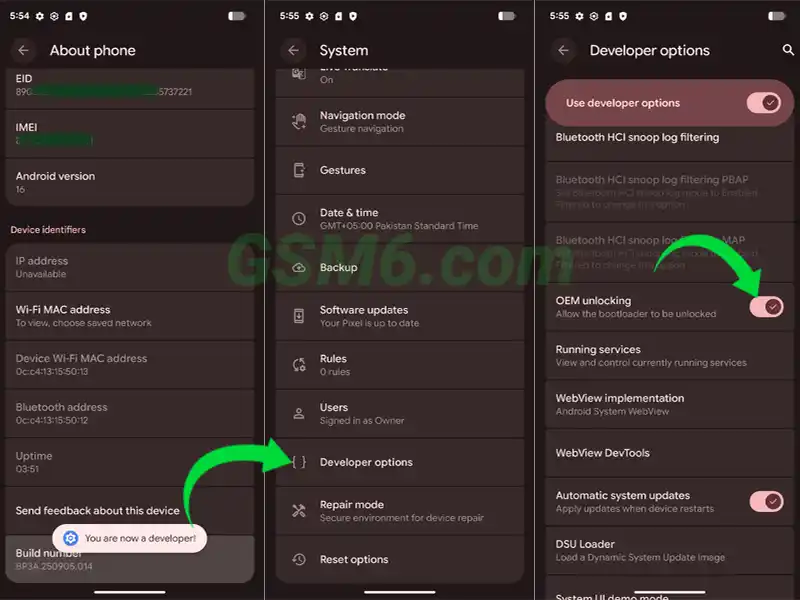
Enable OEM Unlocking in Developer Options
2. Unlock Google Pixel Bootloader in Fastboot Mode
Unlocking the bootloader permits unsigned partition images to be executed by the Tensor primary bootloader.
- Power down your Pixel completely.
- Press and hold Volume Down and the Power button simultaneously until the device boots into Fastboot Mode.
- Connect the phone to your computer with a high-quality USB-C cable.
- Open a command prompt or terminal in your
platform-toolsdirectory and test communication:fastboot devices - Initiate the unlock procedure:
fastboot flashing unlock - On the device screen, use the Volume keys to navigate to Unlock the bootloader, then press the Power button to confirm. The phone will perform a factory data reset and reboot to Fastboot.
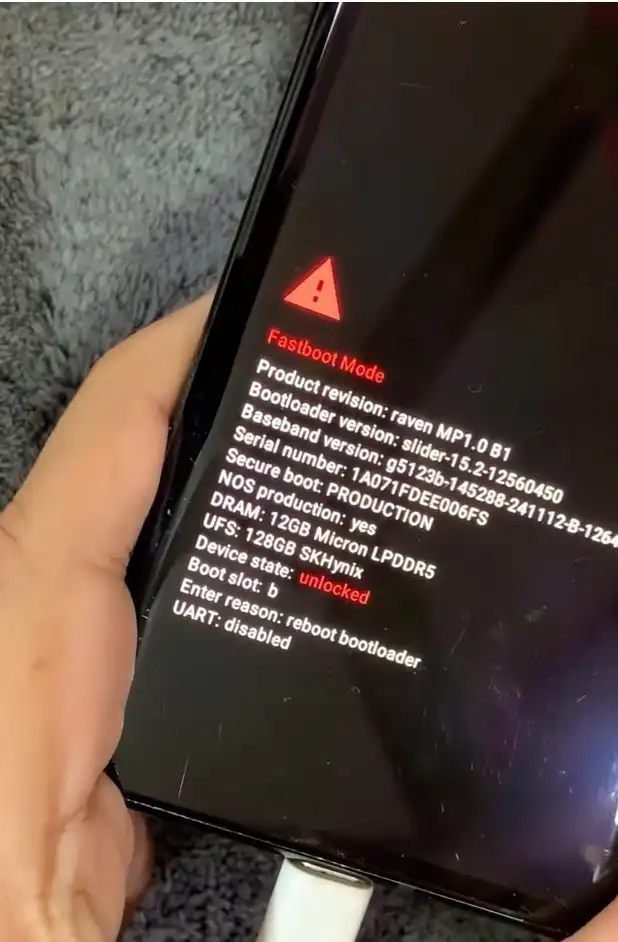
3. Extract and Identify Target Boot Image from Factory Firmware
- Download the full factory image
.zipfor your specific Pixel model and build number from the Google Developers portal. - Unzip the main factory archive. Inside, locate a secondary ZIP named
image-[codename]-[build].zip. - Open this secondary archive and extract the target file:
- Identify the patch target from the exact factory-image contents and Magisk documentation.
- Connect your unlocked phone (after completing initial setup) and copy the extracted
.imgfile to the device’s internalDownloaddirectory.
4. Patch Target Image Using Magisk Manager
- Download and install the latest official Magisk APK from the official GitHub repository onto your Pixel.
- Open the Magisk app.
- In the top Magisk card, tap Install.
- Under Method, choose Select and Patch a File.
- Use the Android file picker to select the transferred
boot.img(Pixel 6) orinit_boot.img(Pixel 7/8/9/Fold). - Tap LET’S GO. Magisk unpacks the ramdisk, injects its systemless root binaries and sepolicy rules, and saves the output to your
Download/folder asmagisk_patched_[random_string].img. - Transfer this patched
.imgfile back to your computer and place it in yourplatform-toolsdirectory.
5. Flash Patched Image and Verify Root Status
- Reboot your Pixel into Fastboot Mode:
(Or power down and hold Volume Down + Power).adb reboot bootloader - Verify communication with
fastboot devices. - Flash the patched image to the respective partition:
- If the verified target is
init_boot:fastboot flash init_boot magisk_patched.img - If the verified target is
boot:fastboot flash boot magisk_patched.img
- If the verified target is
- Once the flash command reports
OKAY, reboot the phone into Android:fastboot reboot - When Android boots, open the Magisk app. The interface will display a green status indicator stating Installed along with the active Magisk version number.
Troubleshooting Bootloop and Connection Failures
If you encounter unexpected errors during or after flashing, apply the following diagnostic remedies:
Bootloop or Device Hanging at Google Splash Screen
If the device does not boot within five minutes, you likely patched an image from a mismatched build or patched boot.img instead of init_boot.img.
- Hold Power + Volume Down to re-enter Fastboot Mode.
- Flash the original, stock unpatched image extracted directly from the factory archive:
(Orfastboot flash init_boot init_boot.imgfastboot flash boot boot.imgon Pixel 6). - Execute
fastboot rebootand verify the result. Restoring one stock image does not guarantee a clean boot or data preservation after every failed modification.
Fastboot Device Not Detected on Windows
If fastboot devices returns a blank line:
- Open Windows Device Manager.
- Locate the entry labeled
AndroidorPixelunder Other Devices with a yellow warning triangle. - Right-click, select Update driver > Browse my computer > Let me pick from a list of available drivers.
- Select Android Device > Android Bootloader Interface and click Install.
Video Tutorial: Rooting Google Pixel with Magisk
To see the complete workflow executed step by step on hardware, watch the detailed walkthrough below:
Summary and Maintenance Recommendations
Rooted-update behavior depends on the installed build, slot state, Magisk release, and modified partitions. Follow the current Magisk OTA/update instructions and Google’s exact factory-image warnings. Removing -w from a script is not a general guarantee of data preservation. Unrooting and bootloader relocking are separate: restore complete matching stock firmware, verify normal boot, and accept the relock wipe before locking.