Samsung Auto Blocker: Turn It On or Off and Check What It Blocks
You can manage Samsung Auto Blocker under Settings → Security and privacy → Auto Blocker. Turning it off may be necessary for a particular app installation or development task, but it does not automatically enable ADB, unlock the bootloader, or make every diagnostic code work.
This guide explains how to change the setting deliberately, check whether it caused your problem, and restore it afterward. You need access to the phone’s Settings and any authentication the phone requests; this is not a way around its screen lock or account verification.
What Auto Blocker changes
Auto Blocker groups several security controls into one setting. Samsung introduced it with One UI 6 as an optional protection against untrusted app installations and harmful USB activity, alongside messaging-image protections. Its original announcement is useful for understanding the purpose, but newer versions have additional options.
| Control | What it means for your task |
|---|---|
| Restrictions on app sources | An APK obtained outside the accepted stores may be blocked before installation |
| USB command restrictions | A connected computer may be unable to perform the intended command-based operation |
| Messaging-image protection | The feature includes protection related to suspicious image content; it is not a promise that every file is harmless |
| Additional restrictions | Read the options actually shown on your phone instead of applying an older screenshot to every model |
Changing Auto Blocker removes a particular restriction. It does not establish that an app is trustworthy or that a repair command is suitable for your device.
One UI version and default settings
Do not assume Auto Blocker is always on, or always off, just from the Galaxy name. Samsung’s original One UI 6 announcement described an opt-in feature. Its current support guidance says devices released with One UI 6.1.1 have it enabled by default, while an upgrade to that version preserves the previous setting. Check the toggle on the actual phone.
Maximum restrictions is a separate set of additional controls introduced with One UI 6.1.1. It can affect functions beyond app installation or debugging. Menu labels and the available controls vary with the model and software. Samsung explains the current options in its Auto Blocker support guide.
For troubleshooting, record both the main toggle and any additional restrictions before changing them. That gives you a clear before-and-after comparison and a way to restore the original configuration.
Before changing the setting
Identify the one task you are trying to complete. “The phone will not connect” is too broad: note whether Windows cannot see it, ADB reports unauthorized, an APK installation is blocked, or a diagnostic menu does not open.
- If the error explicitly names Auto Blocker, inspect that setting first.
- If the phone only charges, test the cable and USB mode before changing security settings.
- If ADB is unauthorized, check the computer-approval prompt on the phone.
- If the device belongs to an employer or school, ask its administrator about the permitted workflow.
No Auto Blocker APK, paid unlocking package or PC utility is needed to use this built-in menu. Avoid tools that claim they are required just to expose the normal toggle.
Change Auto Blocker for a specific task
1. Open the Auto Blocker menu
Open Settings, select Security and privacy, then Auto Blocker. If you cannot find it, search Settings for its name and check the phone’s One UI version under its software information. Do not substitute a similarly named third-party app.
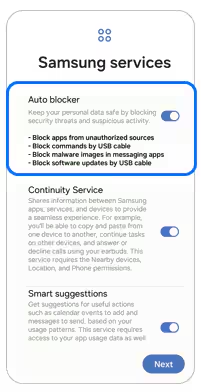
Auto Blocker menu. Your software version may show different descriptions or additional options.
2. Change the required setting
Read the restriction associated with the blocked action. If the task requires Auto Blocker to be off, turn off its main switch and complete the authentication shown by your phone. Do not assume that every software version accepts the same combination of PIN, password or biometrics.
If the control is unavailable or a management policy prevents the change, record the message and use the owner’s or administrator’s support route. Repeated attempts with service utilities do not establish permission to change a managed setting.
3. Test only the intended action
Retry the original task once and record the result. For USB debugging, the debugging setting and computer authorization must still be configured separately. The Platform-Tools guide explains those connection checks; the Samsung USB driver guide covers Windows detection.
If an app installation remains blocked, read the new message instead of assuming Auto Blocker is still responsible. A separate installation permission or device policy can be involved. Do not turn off unrelated protections one by one without identifying the cause.
4. Restore protection and verify it
When the task is finished, return to Security and privacy → Auto Blocker and turn it on. Review any additional settings against the configuration you recorded. If you enabled USB debugging only for this task, turn it off and revoke computer authorizations you no longer need.
Reopening the menu and checking the toggle is a better completion test than assuming the setting reverted automatically. Re-enabling Auto Blocker does not undo an app installation or reverse commands already executed.
What turning it off does not do
Auto Blocker controls a specific group of protections, not every repair or development feature. These distinctions help you choose the next troubleshooting step:
| Expected result | Actual boundary |
|---|---|
| ADB starts working immediately | Drivers, debugging state and host authorization remain separate checks |
The *#0*# menu always opens | Availability can depend on the model, software and configuration; do not promise a universal result |
| Account verification disappears | Auto Blocker is not an account-recovery or FRP-removal setting |
| The bootloader becomes unlockable | Bootloader policy is separate from this toggle |
| A repair tool supports the phone | Tool and firmware compatibility still need independent verification |
Use this page for the setting itself. A failed diagnostic code or repair operation needs its own model-specific investigation, not a repeated Auto Blocker toggle.
If the option is missing or the problem remains
Record the model, One UI version, exact blocked action and error wording. For a managed phone, ask the administrator to check the applicable policy and Samsung Knox’s enterprise Auto Blocker guidance. Do not remove a work profile just to experiment with this setting.
For a personal phone, compare the current menu with Samsung’s support instructions for your region and software. If the error does not change after a controlled test, restore the setting and investigate the cable, application or device state implicated by the error.
Video walkthroughs
These videos remain available as visual references. Their demonstrations do not establish support for every current Galaxy model or software build.
Auto Blocker and USB debugging
Diagnostic menu demonstration
A practical default
Keep Auto Blocker enabled for routine use. If a legitimate task requires a change, make that change deliberately, test the task, and restore the setting afterward. The important result is understanding which restriction affected your task, not leaving protections disabled because a general repair checklist said to do so.