Diagnose Trigger Anti-Crack Exceptions on Transsion Phones
The “Trigger Anti-Crack Exceptions” message appears in the recovery flow on some Transsion devices, including some Infinix, Tecno, and Itel builds. The message alone does not establish whether the cause is a verified-boot failure, damaged firmware, an interrupted update, calibration data, or another model-specific condition.
The recorded demonstration uses a circulated Aftersales Tool package and parameter-writing controls. No public signed service bulletin was found that authenticates this package as an official universal repair or proves that the same sequence applies across Transsion models. Use the demonstration only as a case record for the exact phone/build shown.
The symptom must be separated from the diagnosis. An integrity failure is different from an IMEI or baseband-calibration fault, and a recovery message does not prove which partition or security check failed. Record the exact model, build number, prior repair, recovery text, boot state, and tool log before choosing any write operation.
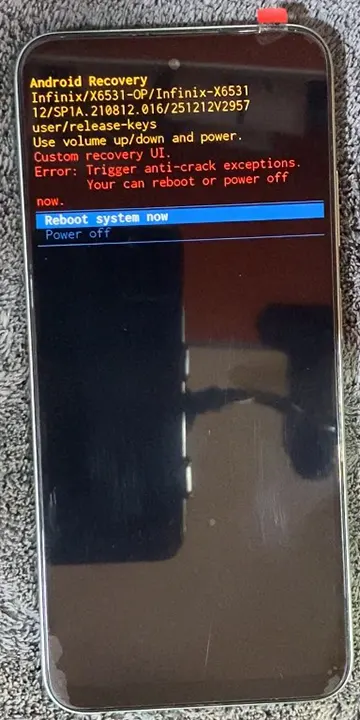
Common symptoms include:
- The screen boots directly into Custom Recovery UI with bright red text reading trigger anti-crack exceptions.
- The on-screen interface restricts choices to Shut Down and Reboot to Normal.
- Tapping Reboot to Normal immediately power-cycles the phone back into the same locked recovery screen.
- Standard Android fastboot commands and stock recovery factory-reset operations fail to bypass the exception.
For technicians and device owners, this state can feel like a bricked device, but the underlying hardware remains fully accessible through pre-boot serial interfaces such as MediaTek Meta Mode or Unisoc diagnostic endpoints.
Diagnostic Scope and Compatibility
This procedure is not a universal fix. While it resolves specific integrity exceptions on certain Transsion models (typically those running MediaTek chipsets on older security patch levels), it may fail on devices with locked or damaged pre-boot environments.
| Brand | Typical Supported Interfaces |
|---|---|
| Infinix | MediaTek Meta Mode / Unisoc Diag |
| Tecno | MediaTek Meta Mode / Unisoc Diag |
| Itel | Unisoc Diag / MediaTek Meta Mode |
The tool interface offers chipset selections, but their presence does not certify model support:
- MediaTek (MTK): Communicates via virtual COM port in Meta Mode (BootROM handshake).
- Unisoc / Spreadtrum (SPD): Communicates over SCI USB2Serial diagnostic channels.
- Qualcomm: EDL or QDLoader 9008 access, when exposed and authorized, is separate from proof that this parameter workflow applies.
Required Software and Driver Preparation
Before attempting the parameter rewrite, establish the necessary communication drivers on a 64-bit Windows PC:
| Component | Role | Reference |
|---|---|---|
| Aftersales Tool V7 | Primary service software with built-in Meta Mode handler | Aftersales Tool Overview |
| MediaTek USB Drivers | Bridges USB VCOM handshakes for Helio and Dimensity processors | MediaTek Drivers Guide |
| Unisoc / SPD Drivers | Provides COM port virtualisation for Unisoc T-series processors | Unisoc SPD Drivers Guide |
| Qualcomm USB Drivers | Enables HS-USB QDLoader connectivity for Snapdragon chipsets | Qualcomm Drivers Guide |
Data-Loss Boundaries and Prerequisites
Critical Warning: Writing low-level parameter blocks carries a significant risk of total data loss or an unbootable device if the wrong model profile is used or the connection is interrupted.
- Backups: A stock recovery normally does not expose an unrestricted ADB shell or a complete user-data backup path. Make a verified backup while Android still boots; if it no longer boots, assume encrypted user data may be unrecoverable before any erase or flash.
- Evidence gate: Continue only when the exact model, firmware build, chipset, tool build, and an applicable service procedure are documented. A screenshot or success banner from another phone is not sufficient.
- When to Stop: If the tool repeatedly fails to detect the COM port, throws a BROM authorization error, or hangs during the parameter write, stop immediately. Do not force multiple mismatched flash attempts, as this can corrupt the baseband permanently.
Step-by-Step Fix Guide
The following sequence documents the recorded demonstration. It is not a universal prescription and must not be used until the evidence gate above is met.
1. Install chipset drivers and prepare the device
Begin by installing the signed USB driver corresponding to your phone’s processor architecture. On your phone screen, tap Shut Down from the Custom Recovery UI so the device powers completely off. Ensure the battery maintains at least 30% charge, and leave the phone disconnected from the computer during initial driver setup.
2. Launch Aftersales Tool and select CPU architecture
Right-click the Aftersales Tool executable on your Windows workstation and select Run as administrator to prevent permission drops when binding virtual COM ports. From the main interface dropdown, select the target processor family (MTK, SPD, or Qualcomm).

Selecting a chipset family does not select or validate an exact model profile. Stop if the tool cannot identify the device and build unambiguously.
3. Connect the powered-off phone in Meta Mode
With the phone fully powered off, connect a stable USB cable from the PC to the phone. The tool detects the device handshake and initializes Meta Mode communication. Wait 10 to 20 seconds while the connection log displays device initialization messages and confirms communication has stabilized.
4. Write parameter and authentication blocks
Navigate to the Set Parameter / Start Authe tab within the Aftersales Tool interface.
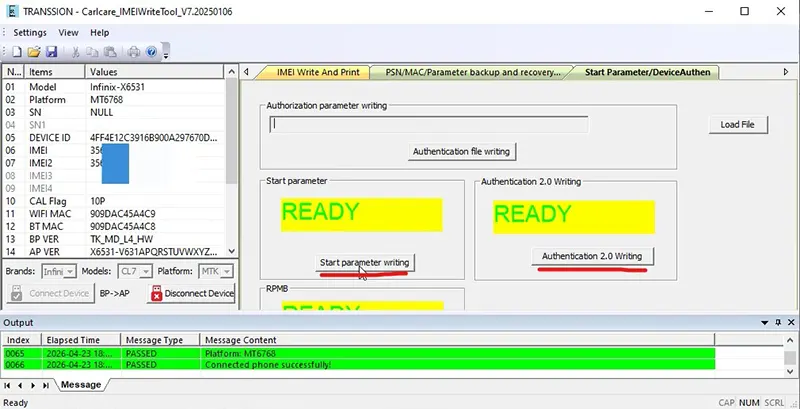
In the recording, the operator used Start Parameter Writing and Authentication 2.0 Writing. The meaning of the red output and the scope of the written blocks have not been verified against public technical documentation. Do not interpret an Authentication Success banner as proof that cryptographic signatures, calibration, or normal boot were repaired.
5. Disconnect and reboot into Android
Click the Disconnect device button inside Aftersales Tool to cleanly close the active serial port. Unplug the USB cable from the phone.
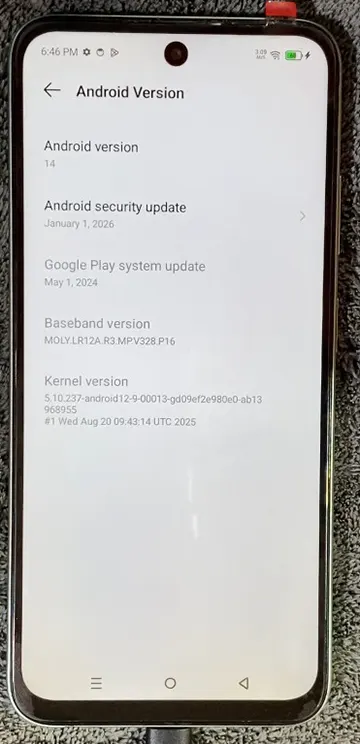
Press and hold the Power button to test a normal boot. Verify the exact build, baseband, SIM/network state, cameras, sensors, identifiers, and several cold boots. The pictured phone booted after the recorded attempt; that single result does not prove full operation, data preservation, permanence, or support for another model.
Video Walkthrough
Technicians who prefer an end-to-end visual demonstration can follow along with this recorded service session: