Create Apple ID: Resolve Account Verification and SMS Errors
Registering an Apple Account (formerly Apple ID) is an essential prerequisite for activating an iPhone, iPad, or Mac, accessing the App Store, and synchronizing data via iCloud. However, prospective users frequently encounter generic failure notices during registration, such as “Your account cannot be created at this time,” or find that two-factor verification codes (OTP) fail to deliver to their mobile number.
When the code never arrives, the quickest route is the one Apple’s own setup wizard exposes: use a temporary US or Canada number to clear the phone prompt, skip the OTP with Verify Later, and then attach your personal number inside iCloud settings. This guide covers that full sequence, including the Find My step that keeps the account from locking onto the temporary number.
Before you start: Treat the temporary number as short-lived. Steps 9-10 replace it with your real number, and step 12 explains what to do when Apple has flagged that number. Never leave Find My off on a production account longer than necessary.
Why Apple Account Verification Fails
When an account registration request reaches Apple’s identity verification servers, several real-time security evaluations occur simultaneously:
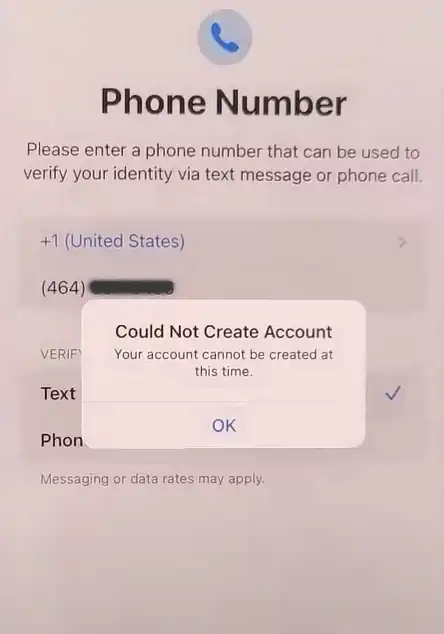
Apple ID Error “Could Not Create Account”
- Account-creation availability: Apple can limit creation on a device or display a temporary creation error. The message does not expose an immutable counter or its internal cause.
- Network conditions: VPNs, captive portals, filtering, or an unstable connection can interrupt the request. Try a trusted connection without assuming that IP reputation is the cause.
- Code delivery: SMS or voice delivery can be delayed or unavailable for a particular line, especially when the local carrier is flagged by Apple’s regional checks.
- Existing account details: An email address or number may already belong to an Apple Account. Use Apple’s account lookup or password-recovery flow instead of creating a duplicate.
Comparison of Registration Pathways
Choosing the optimal registration platform significantly reduces verification friction:
| Registration Method | Device Quota Impact | Phone Verification Flexibility | Reliability Rating |
|---|---|---|---|
| Web Browser (account.apple.com) | Separate supported creation route | Uses the verification choices Apple presents | Useful alternative |
| Supported Apple app on desktop | Separate supported creation route | Uses the verification choices Apple presents | Useful alternative |
| iPhone or iPad setup/settings | On-device creation route | Offers the “Verify Later” fallback | Best for this method |
Step-by-Step Account Creation Guide
Follow this numbered procedure to register your Apple Account, get past the stuck OTP screen, and leave the device tied to a number you actually control.
Erase all content and settings. Go to Settings > General > Transfer or Reset iPhone > Erase All Content and Settings. A clean device gives you a fresh Setup Assistant and avoids account leftovers from a previous Apple ID.
Create a new Apple ID in the setup wizard. Power on and choose your language and region, join a stable Wi-Fi network, then tap Don’t Transfer Apps & Data on the Apps & Data screen. At the Apple ID prompt, tap Forgot password or don’t have an Apple ID? and then Create a Free Apple ID.
Tap “I Don’t Have an Email Address”. Let iOS generate a free @icloud.com address for the account, then enter your real name and date of birth. This removes the extra email-confirmation step that often fails during registration.
Critical: when it asks for a number, use a USA or Canada number. Switch the country code to United States (+1) or Canada (+1) and enter a number from the generator below. Do not submit your own number here — if it is flagged, the verification request is exactly what keeps failing.
- Skip the OTP with "Verify Later". The code goes to the temporary number, so you cannot receive it. Tap Didn't receive a code? (or Did not receive an OTP) and pick Verify Later from the options list.
- Finish setup without number verification. Continue through the rest of Setup Assistant until the home screen appears. The Apple ID exists now, but its trusted number is still temporary.
- Open Settings and tap your iCloud account. Tap your name and profile picture at the top of Settings to open the Apple Account page.
- Critical: turn off Find My iPhone immediately. Open Find My > Find My iPhone and turn it off, confirming with the Apple ID password. Doing this before the temporary number expires is what prevents an Activation Lock on the device. Hold off on enabling iCloud data until your real number is verified.
- Verify a different number. Go to Sign-In & Security > Phone Numbers, tap Verify a Different Number (or Add a Trusted Phone Number), choose your real country, enter your personal mobile number, and type the OTP sent to it.
- Remove the temporary number. Return to Sign-In & Security > Phone Numbers, tap the temporary US/CA number, and choose Remove Phone Number. Your own number should be the only trusted number on the account.
- Set up the App Store and check everything. Sign in to the App Store with the new Apple ID and download a free app, then open iCloud and confirm the account syncs and the temporary number is gone.
- Re-enable Find My and finish. If step 11 checks out and your number receives codes, turn Find My iPhone back on. If OTPs still fail or you hit a verification error, leave Find My off, keep the ID as it is, and wait 10 days (the cooldown for a flagged number). After 10 days, verify your personal number again and remove the temporary number.
Troubleshooting Persistent Registration Failures
- “Your account cannot be created at this time” on web: Clear your browser cache and cookies, switch to a different web browser, and retry during non-peak hours.
- “Verify Later” is missing: Update iOS first. If the option still does not appear, erase the device and start over with a fresh US or Canada number from the widget.
- Temporary number rejected by Apple: Request another number and retry. Avoid reusing the same number for multiple accounts in a short period.
- Payment Method Demanded: Register through the setup wizard instead of a desktop client, and choose None if a payment method is requested. A card can be added later.
- Account Locked Immediately Upon Creation: Multiple rapid attempts from the same IP address can trigger this. Wait 24 hours before trying again.
- OTP still missing after the cooldown: Ask your carrier whether your line can receive Apple short codes, then repeat step 9.
Video Walkthrough
Watch this recorded visual walkthrough detailing account creation workflows and verification resolution: